
Field | Value |
|---|---|
Module ID | [REF-CATEGORY-###] |
Owner | Michelle Castillo |
Last Reviewed | March 3, 2026 |
Version | 1.0 |
Creating Teamwork Tasks (& Sub-Tasks). As needed; when a task needs to be delegated to self or another team member or an issue is raised by a client.
Validation for success: The Teamwork task is created and assigned to self or another team member.
- You have access to the Company Teamwork Account
- You have access to Hubstuff and install the timer on your computer
Procedure
Add a new task to a specific client (Project Name) then add more details and include links, files, images as needed.
NOTES:
- TW = Teamwork (shorthand)
- Teamwork has more than one viewing option. The instructions below were developed with the "new list view" toggle turned OFF.

- On Project List, click the Project Name for the specific client. This will take you to the "Dashboard" tab for the client.
- NOTE: If you select certain projects as "favorites" (i.e. toggle on the STAR icon), those projects will appear in your project list at the top.
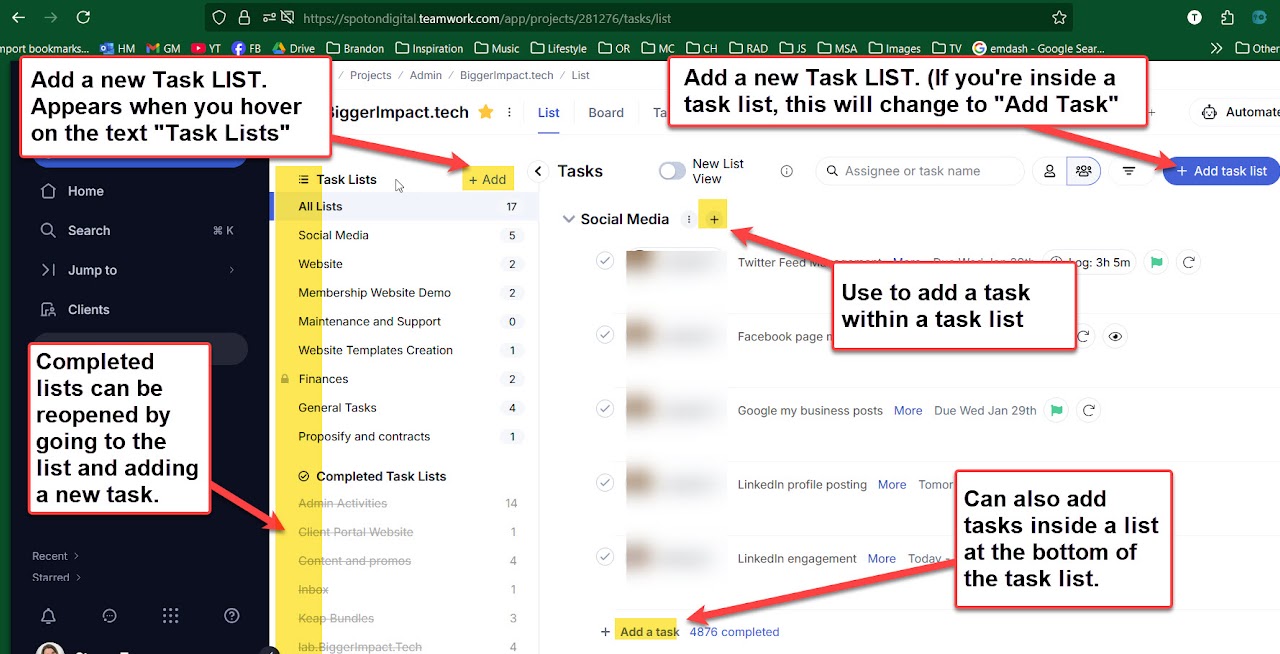
- Once in the intended client project, click the "List" tab. The list tab organizes tasks into groups/categories. In the sidebar, you'll see "Task Lists" for active tasks and "Completed Tasks" for completed items.
- NOTE: Task lists that are completed can always be reopened by going to the completed task list and adding a new task.
- Select (or create) an appropriate Task List for your new task.
- If there is an existing related Task List (e.g. "Website", "Email Marketing", or "%Client Program%", etc.) to the task you want to create (review both the active and completed tasks in case there is a list that needs to be reopened), click "Add a task" under/within that task list. If the task is a general task, add it under "General".
- If there is no appropriate task list at the moment, but you know there will be a series of related tasks, you can create a new task list by clicking the blue "Add task list" button.
- SEE SCREENSHOT: If you are adding tasks from a template (i.e. sets of related tasks that are already developed and can be reused), when you click "add task list", select the "Would you like to use a a template" option to find the template you need. This will create the template as its own task list.
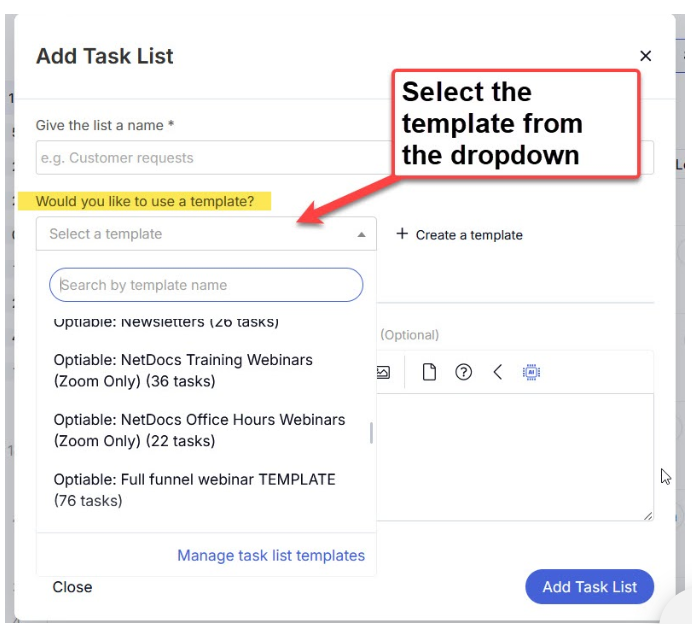
NOTE: If you're starting from a template, the tasks will already be created, and you'll only need to make sure the right people are notified, due date and reminders are assigned.
- Add a Title to the task (Short description of what needs to be done).
- Provide a detailed description for this task:
- There is a comment box where the specific instructions can be outlined. Provide the context and resources (everything the team member assigned needs to know) to complete the task. If there is a relevant SOP, include a link to the SOP. You may refer team members to the Project "Links" area for access to required platforms (but first confirm the needed access details are there).
- It may be helpful to include images and/or screenshot videos of what is needed to complete the task.
- Add important task details
If a task involves multiple steps (as with a newsletter or blog), create a "parent" task with an overall description. Break each step of the process into a sub-task (or "child" task) under the parent task. The sub-tasks due not need the same level of detail as the parent task, but they should include:
- A clear title (if the sub-task is part of a "CHECKLIST" step, this should be the 1st word in the title)
- The person assigned
- The start date
- The due date
- A clear description of what the specific step in the process involves
- Any dependencies
When parent tasks are of a repeating nature and the same processes are involved each time, typically the sub-tasks become "CHECKLIST" steps. The owner of any CHECKLIST steps does not need to reassign these back to the person who assigned.
Important Task Details
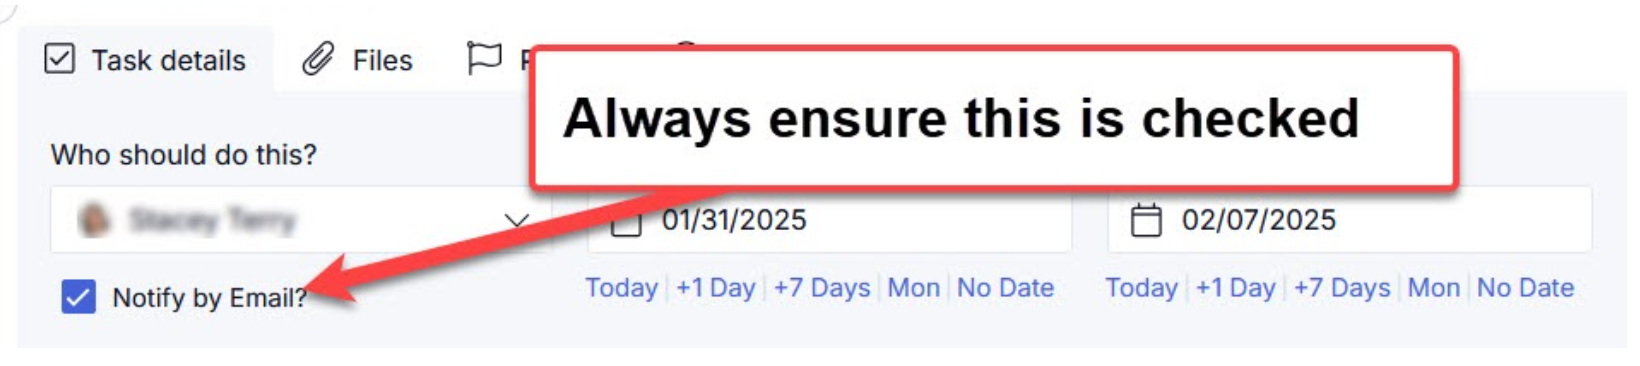
- Who should do this? = Select the team member who will do the task
- Notify by Email? = Always ensure you tick the box to notify the person assigned.
- Add Followers to the task
- Who will get notifications about activity on this task? = Select the team member(s) who needs access to the task.
- Set Privacy
- Privacy — Who can see this task? = by default, Everybody on the project but you can select people if you need the task to be restricted to specific people only.
- Provide a detailed description for this task = Add task details and include links, files, images as needed.
- If the task DOES NOT need to be turned back to the person who assigned upon completion, please note this in the task description as it is an exception to the rule.
- If the task is a parent task involving CHECKLIST sub-tasks, please include a note such as:
- Complete "CHECKLIST" sub-tasks as "double checks" to ensure all actions are complete (you can mark these "CHECKLIST" sub-tasks as complete). Once sub-tasks are complete, reassign this parent task back to the person who assigned.
- Add Files (if applicable)
- Upload/attach files needed.
- Add Tags (if applicable)
- There are many available tags in the dropdown list. Choose a tag if you want this task to stand out from general tasks in some way. Look through the list for various options. Some examples include:
- Pending content = if the task can't move forward because there is pending or missing content (make sure to follow this up with Michelle or immediate Supervisor or the client, if needed)
- Has dependency(ies) = if the task has dependency(ies) on other open tasks
- Action needed = if there is an urgent action needed from assignee
- Gathering information = if the task requires from research or troubleshooting that needs more time than expected
- To be discussed with Michelle = if the task has missing information or needs clarification from Michelle or the client.
- There are many available tags in the dropdown list. Choose a tag if you want this task to stand out from general tasks in some way. Look through the list for various options. Some examples include:
- Set the Priority (if applicable - e.g. None, Low, Medium, High)
- If no priority, no action required.
- OPTIONAL: Set Progress & Time
- Currently, we have not been using this feature.
- Set Dependencies (if applicable)
- Are there tasks that must be done first? = Select related tasks which must be completed first before the task can be marked complete.
- Set Start Date = Set the date the task is assigned OR this might be the date the task should start if it should not be worked on until the future.
- Set Due Date = Select specific due date to help team members know when turn around is required.
- Set Repeats (if applicable).
- Set Reminders
- Set a reminder for person assigned (e.g. Due Date, Day Before Due Date, or Custom Reminder) - usually choose the due date
For Custom Reminder:- Who will we send the reminder to? = be default, all people assigned to the task but you can set it to yourself only
- When and how will we send the reminder? = Date, Time, and Email Reminder
- Message = Add message to remind yourself or other people what needs to be done on the chosen date for reminder.
- Set a reminder for person assigned (e.g. Due Date, Day Before Due Date, or Custom Reminder) - usually choose the due date
Escalation if not successful
Reach out to Michelle or immediate Supervisor for any questions or concerns.
Successful Conclusion
The Teamwork task has been created and assigned to the person who needs to take action and get it done.
Comments are closed.